
Keurig coffee makers have become a beloved addition to countless kitchens, delivering quick and convenient cups of java at the push of a button. However, to ensure the best-tasting coffee and longevity of your machine, it is crucial to regularly clean the needle. In this blog, we will guide you through a simple step-by-step process on how to clean the needle on a Keurig.
How Do You Know If You Need To Clean Your Keurig Needle?
Signs that indicate you need to clean your Keurig needle include:
- Slower brewing time: If your Keurig takes longer than usual to brew a cup of coffee or other beverages, it could be due to a clogged needle.
- Reduced amount of coffee dispensed: If your Keurig is not filling up your cup to the desired level, there may be a blockage in the needle preventing a proper flow of water.
- Incomplete brewing: If you notice that your coffee is weaker or the flavor is not as strong as usual, it could be an indication that the needle needs cleaning.
- Coffee grounds in your cup: If you see coffee grounds floating in your brewed beverage or notice sediment at the bottom of your cup, it suggests that the needle is not piercing the pods properly.
- Unusual noises: If you hear strange noises coming from your Keurig while brewing, it could be a result of a clogged needle struggling to push water through.
What Will You Need For Needle Cleaning
- Paper clip
- Running water
- Brewer maintenance pod (optional)
- Keurig rinse pod (optional)
How To Clean The Needle ON A Keurig
1. Accessing the Needles
- Start by turning off and unplugging your Keurig machine.
- Take out the pod holder from your machine.
- Remove the funnel from the pod holder.
2. Unclogging the Needles
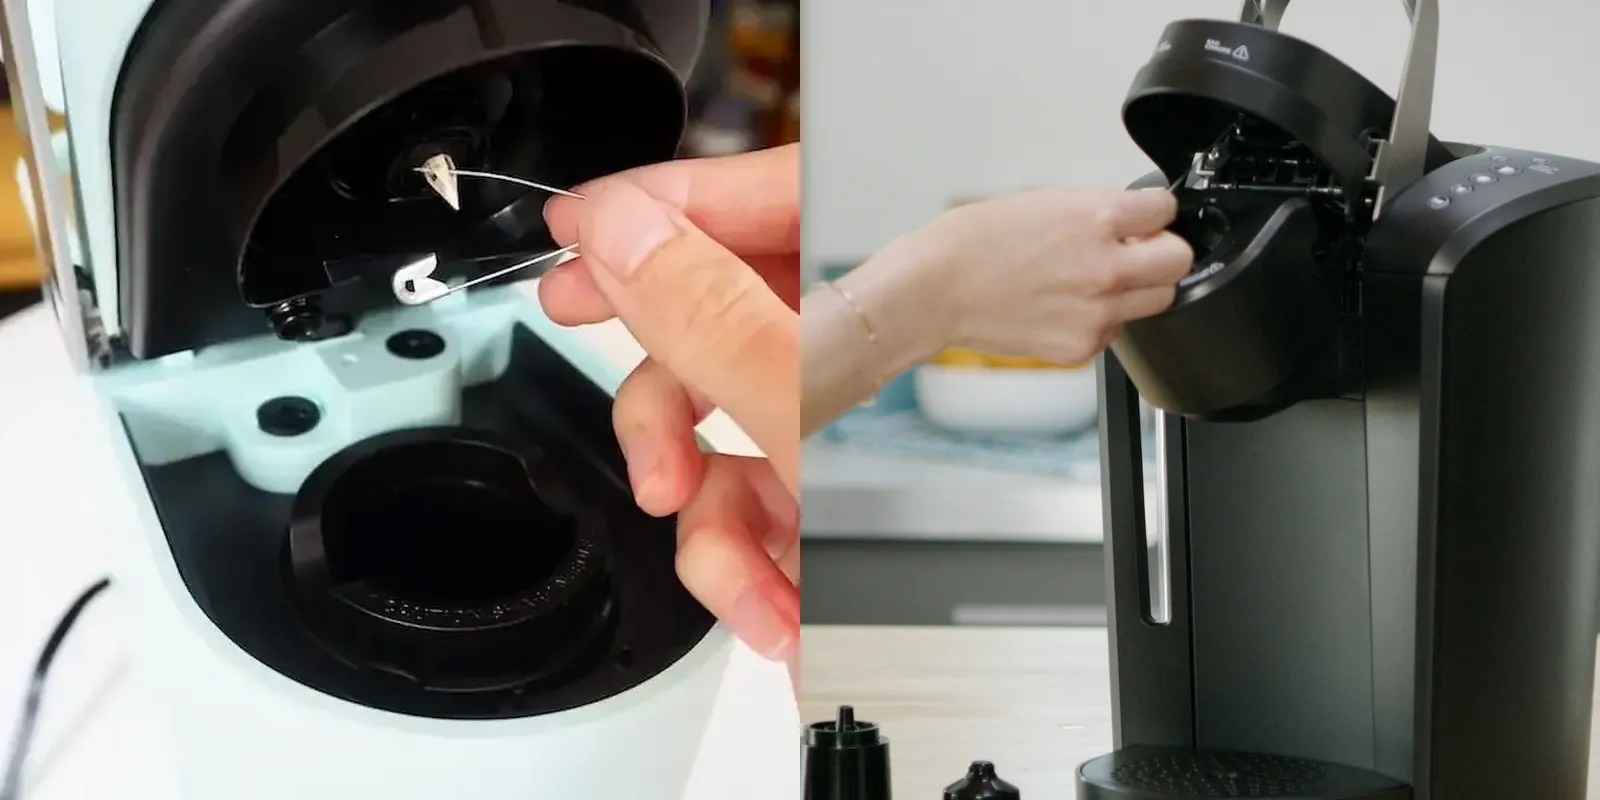
- Find the tube at the bottom of the pod holder and carefully insert a paper clip into it.
- Rinse both the pod holder and funnel under running tap water to clean them thoroughly.
- Locate the entrance needle under the brewer’s head and use a paper clip to remove any particles that may be clogging it.
3. Finishing the Clean
- Put the pod holder and funnel back together.
- Reinsert the assembled pod holder into your Keurig machine.
- Run two brew cycles using only water to flush out any remaining debris or residue.
Alternate MethodsTo Clean Keurig Needle
Using A Brewer Maintenance Pod
A brewer maintenance pod is a pre-packaged cleaning solution explicitly designed to address needle clogs and mineral buildup.
Ensure that your Keurig machine is turned off and unplugged. Then, remove the pod holder and place the maintenance pod in its place. Close the lid and turn the machine on. Follow the specific instructions provided by the manufacturer to complete the cleaning cycle. The maintenance pod will run a series of water and cleaning solution cycles, effectively clearing any blockages and ensuring optimal performance.
Using Keurig Rinse Pod
Keurig rinse pods are an alternative to the maintenance pod and offer a quick and convenient cleaning method. Start by turning off and unplugging your Keurig machine. Insert the rinse pod into the pod holder and close the lid. Turn on the machine and run one or two brew cycles with only water. The rinse pod will effectively remove any residue or build-up from the needle, leaving it clean and ready for use.
Conclusion
By regularly cleaning the needle on your Keurig, you can guarantee a consistently great cup of coffee every time. Say goodbye to clogged needles and unpleasant residue, and embrace a cleaner, more efficient brewing experience. Don’t forget to incorporate this straightforward maintenance routine into your coffee-making ritual, and enjoy the smoothest, most flavorful brews from your Keurig for years to come.