
If you are having problems with your Keurig K155, read on for some solutions that may help. First, take a look at the common issues that can occur, and then learn about the best ways to solve them. After that, check out our Keurig K155 Troubleshooting guide to help you get the most out of your coffee maker.
How does a Keurig K155 coffee maker work?
The Keurig K155 coffee machine works by using a combination of water pressure and heat to brew coffee from pre-packaged K-Cup pods. Here are the basic steps:
- Add Water: Fill the water reservoir located on the back of the machine with fresh water. The machine can hold up to 90 ounces of water.
- Turn on the Machine: Press the power button located on the front of the machine to turn it on. The machine will begin to preheat the water.
- Select a K-Cup: Choose a K-Cup pod and place it in the pod holder located on the front of the machine. The K-Cup holder can accommodate different sizes of cups, ranging from 4 to 12 ounces.
- Brew Your Coffee: Choose the size of cup you want to brew by selecting one of the buttons located on the front of the machine. The machine will puncture the K-Cup pod and pass hot water through it, brewing your coffee directly into your cup.
- Enjoy Your Coffee: Once the machine is finished brewing, you can remove your cup and dispose of the used K-Cup pod.
Keurig K155 Troubleshooting and Solutions
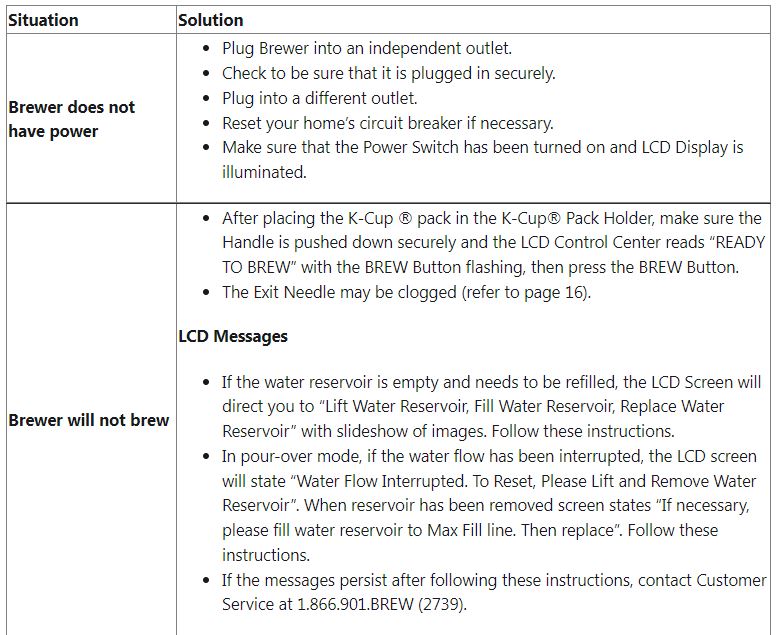
K155 Won’t Turn On
If your Keurig K155 doesn’t turn on, there are a few things you can check to see if the problem is with the machine or with the power cord. If the machine is working and the power cord is plugged in, the problem may be with the cord. Try using another cord to see if the issue persists.
If the machine is not working or the power cord is not plugged in, the issue may be with the machine. Try cleaning the machine and the power cord. If the issue persists, the machine may need to be replaced.
K155 Is Not Dispensing Water
The Keurig K155 water dispenser has been receiving a lot of criticism lately because it is not dispensing water properly. Some people are reporting that the water does not come out of the dispenser at all, while others are saying that the water comes out in spurts and is not consistently filling the cup.
There are a few potential causes for the issue with the K155 water dispenser. One possibility is that the water filter may be clogged. Another possibility is that the water valve may be defective. If you are having trouble with your K155 water dispenser, you may want to take it to a repair shop for a diagnosis.
K155 Is Leaking From The Bottom
Some people are reporting that the machine is leaking from the bottom because of a manufacturing defect. The defect is likely affecting the seals around the water tank. This can cause water to seep into the machine and eventually cause it to leak. If your machine is leaking, you will need to take it to a repair shop. The repair shop will likely be able to fix the machine by replacing the water tank or seals.
K155 Is Leaking When Brewing
When brewing a cup of coffee, many people are unaware of an issue that can occur. Many Keurig K155 single-serve brewers have been known to leak coffee while brewing. This is often due to the leaking plastic gasket that is situated on the side of the brewer. If this gasket becomes detached from the brewer, coffee, and water can leak from the top and bottom of the machine. This can cause a lot of mess and frustration for users.
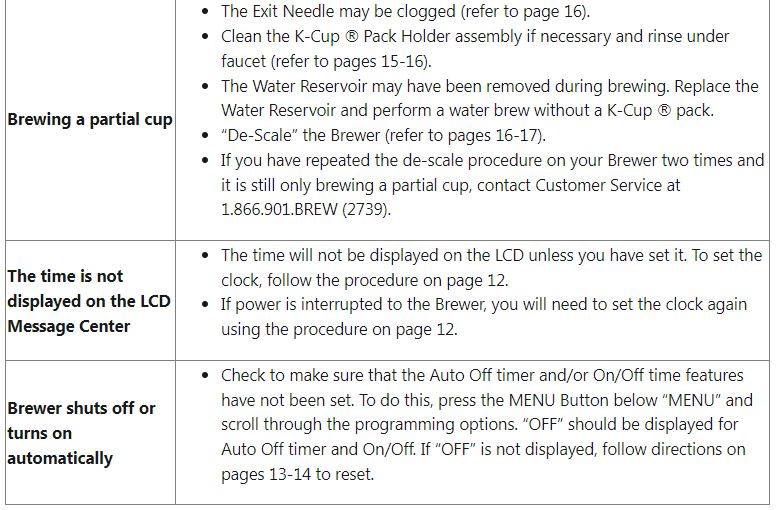
K155 Descale Light Is Always On
Keurig K155 descale light is always on, making it perfect for those who want to keep their coffee brewing experience consistent. This feature makes it easier for users to see what brews are left, and also allows them to clean the machine more easily.
Turn the Keurig on. Wait until the descale light goes out. Turn the Keurig off. Wait for the descale light the green light to reappear. This normally takes about 30 seconds. Once the descale light appears, press and hold the button for 3 seconds. The descale light will disappear again. Press and hold the button for another 3 seconds. The descaled light will return. Now press and release the button. The descaled light should stay off.
To reset the descale light, simply turn the Keurig on and wait for the descale light to go out. Then turn the Keurig off and wait for the descale light to reappear. This usually takes about 30 seconds.
K155 Strong Brew Button Isn’t Working
If you own a Keurig K155, there’s a good chance you’re out of luck with your strong brew button. The button seems to be don’t work often, and it can take up to 10 tries before it’ll turn on. Some have reported that the button even doesn’t work at all, but if you’ve tried everything and still can’t get your Keurig to work properly, it might be worth taking it in for repair.
If after this, your machine still doesn’t work you should contact customer support, and they will be able to provide more help. So, the way to fix this is to reset your water reservoir. Then, try this method of fixing it. Hold the brew button for 5+ seconds, then your Keurig will purge the remaining water in the tank. If this doesn’t fix the problem, give your machine a hit to re-align any parts that may be out of place.
K155 Coffee Tastes Bad
Many people have had experiences where Keurig K155 coffee tastes bad. This issue is often due to the coffee’s grind quality and brewing method. Keurig K155 coffee usually contains a lot of bitterness and acidity, which can make it difficult to drink. Furthermore, the coffee can also cause stomach upset and headaches. If you are experiencing these issues, it is best to switch to another coffee maker.
K155 Coffee Contains Grounds
Do you have a Keurig K155 coffee maker? If so, you may be wondering if it contains grounds. In fact, the K155 contains grounds, which can cause some issues. The K155 contains a charcoal water filter, which is designed to remove grounds and other impurities from the water before it is dispensed. However, the filter can also catch grounds, which can then end up in your coffee.
If you’re concerned about this issue, you can try to remove the grounds before you dispense the coffee. You can do this by using a coffee filter or a coffee scoop. You can also try to use a different brand of coffee if you’re concerned about the grounds in your K155.
Troubleshooting Table
Keurig K155 Instructions
How to Use A K155 Coffee Machine?
To use the Keurig K155 coffee maker, follow these simple instructions.
- Plug the power cord in to the wall outlet.
- Plug the Keurig K155 in to the outlet and turn it on.
- Press and hold down the Green light button for 3 minutes.
How to clean a K155 Coffee Machine?
Keurig K155 users need to be sure to clean their Keurig every few months or so to prevent build-up and other issues. Here are some tips on how to clean a Keurig K155:
- Open the brewer’s lid and empty the entire water supply into the sink.
- Remove any Keurig parts that have been built up over time with soap and water on a cloth or paper towel. Be careful not to damage the equipment.
- Rinse all the parts again with warm water and soap before reinserting them into the brewer.
How to descale a K155 Coffee Maker?
If your Keurig K155 is giving you problems brewing the perfect cup of coffee, it might be time to descale it. Descaling a Keurig is simple and can be done with just a few supplies. Follow these steps to descale your machine:
- Remove the pod holder and filter from the machine.
- Pour about 1 cup of white vinegar into the water reservoir of the machine
- Shut off the power to the machine and empty any water that has accumulated in the reservoir by pressing the button on top of the machine several times.
- Replace the pod holder and filter and turn on power to the machine.
How to reset a K155 Coffee Maker?
Restoring your Keurig K155 is a common task that many people take on. It’s easy to do, and it can help you keep your coffee drinking experience running smoothly. Here are some tips to help you proceed:
- Open the blue box that sits on the top of your machine. This will open up the controls panel.
- On the left-hand side of the control panel, there are three buttons. The first button is called “Reset.” It should be pushed to turn this button on.
- Next, on the right-hand side of the control panel, there are two buttons called “On/Off.” These should both be pushed in towards each other so that they become black and white symbols. This will create a power symbol next to each one, which will indicate that these buttons are now active.

Conclusion
In conclusion, if your Keurig K155 isn’t working properly, the above is your complete guide to fix any issue.