
Keurig is a popular brand among coffee lovers, and the K3000SE is one of their most sought-after brewing systems. Whether you are a business owner or an individual, the K3000SE can provide you with a fresh and delicious cup of coffee within minutes. However, like any machine, the K3000SE can break down over time. That’s where the Keurig K3000SE parts diagram comes in handy.
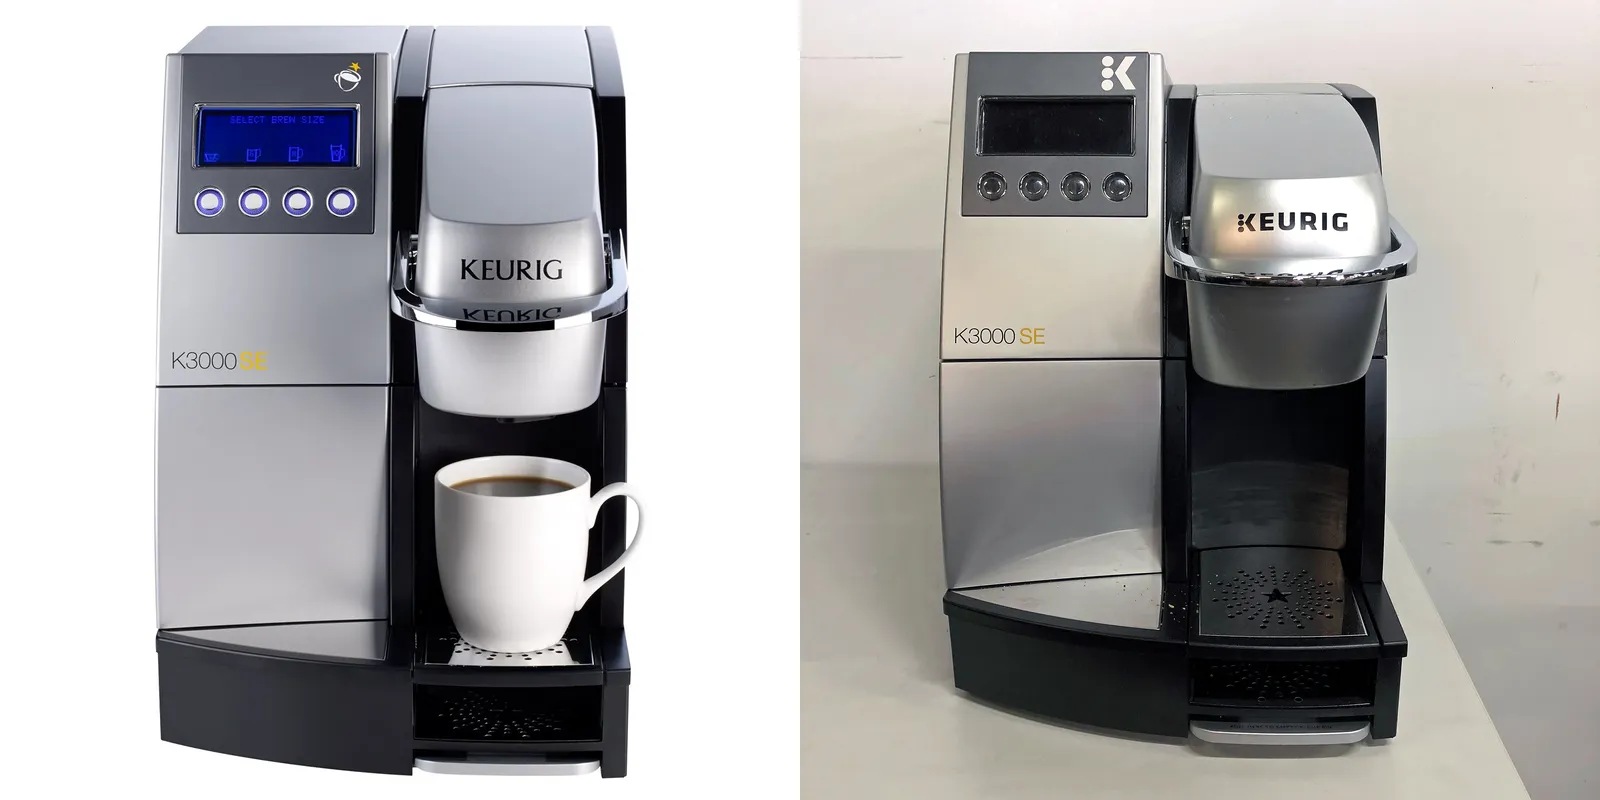
Keurig K3000SE
The Keurig K3000SE is a state-of-the-art coffee brewing machine that’s perfect for an office or commercial setting. It comes fully equipped with all the necessary parts and features to deliver rich, high-quality coffee drinks in a matter of seconds.
The Keurig K3000SE has a large water reservoir that can hold up to 90 ounces of water at once. This means you won’t have to refill it very often, even if you’re making multiple cups throughout the day. The machine has a digital touchscreen display that makes it easy to select your preferred cup size and brew strength. You can choose from four different sizes ranging from 4 ounces to 10 ounces, as well as regular or strong brew options.
Keurig K3000SE Parts
Water Tank Keurig
The water tank is one of the most important components of your Keurig K3000Se machine. It’s what holds the water that is used to make your favorite drinks. If there’s any damage to the tank or its components, it can affect the quality and taste of your beverages.
K-Cup Holder Assembly
One of those features is the K-Cup Holder Assembly, which holds your pods in place while you brew your cup of coffee.The K-Cup Holder Assembly is an essential component of the Keurig K3000Se. It has been carefully designed to ensure that your pods are held securely during the brewing process. The assembly consists of several parts, including a holder arm and a spring-loaded mechanism that keeps your pods in place.
Brew Basket Assembly
Brew Basket Assembly is an integral part of the Keurig brewing experience. This assembly ensures that your coffee grounds are properly filtered, resulting in a delicious and consistent cup of coffee every time. The brew basket assembly is easy to use and maintain, making it a favorite among coffee aficionados.
To assemble the brew basket, simply insert the filter into the basket and add your desired amount of coffee grounds. Once assembled, insert the basket into your Keurig machine and let it do its magic!
Internal Hot Tank
Internal hot tank like the beating heart of your Keurig. It holds and heats up water until it reaches the perfect temperature for brewing a fresh cup of joe. Without it, your coffee would be lukewarm at best! So if you’re experiencing issues with your Keurig not heating up properly or taking forever to brew, chances are there’s something funky going on with that trusty old hot tank.
Keurig K3000SE Diagram
K3000SE Brewer
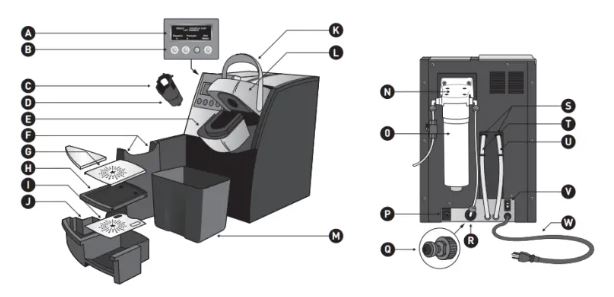
- A. LCD Screen
- B. User Interface Buttons
- C. K-Cup® Pod Holder
- D. K-Cup® Pod Holder Funnel (C and D are the K-Cup® Pod Holder Assembly)E. K-Cup® Pod Assembly Housing
- F. Cup Sensors
- G. Upper Drip Tray Plate
- H. Upper Drip Tray
- I. Lower Drip Tray PlateJ. Drip Tray Base
- K. Handle
- L. Lid
- M. K-Cup® Pod Bin
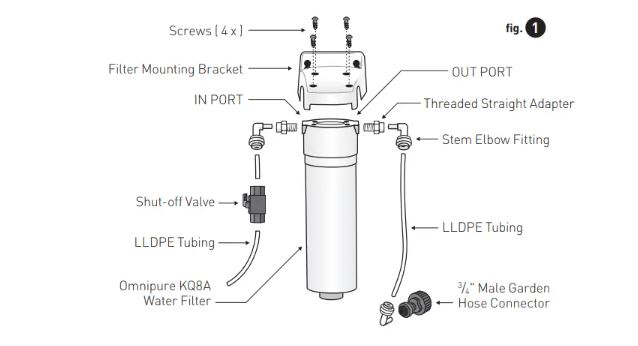
- N. Filter Mounting BracketO. Omnipure KQ8A
- Water Filter (N and are the Filter Kit Assembly)
- P. RJ11 Jack
- Q. 3 /4″ Garden Hose ConnectorR. Brewer Inlet Connect
- S. Drain Plugs
- T. Hot Water Drain Tube
- U. Cold Water Drain Tube
- V. Power Switch
- W. Power Cord
Plumbing Fitting Connections
Maintaining Your Keurig K3000SE
Cleaning the Water Tank
- To begin, first unplug your Keurig K3000Se from its power source to ensure safety.
- Next, remove the water tank from the machine and empty out any remaining water.
- You can then use warm soapy water and a soft-bristled brush to gently scrub away any build-up or residue inside of the tank.
- Rinse thoroughly with clean water before replacing back into the machine.
- If you want to go one step further in ensuring cleanliness, consider using a vinegar solution as well.
Cleaning the K-Cup Holder Assembly
Firstly, you’ll need to take apart the K-Cup Holder Assembly by removing its three main components: the funnel, exit needle and holder itself. Once disassembled, use a cleaning solution or vinegar mixture to soak all three parts before scrubbing away any stubborn residue with a brush. Be prepared for this process taking longer than expected as even after soaking and scrubbing at length some staining may persist.
Descaling the Internal Hot Tank
- Clean the external surfaces of the machine and make sure it is unplugged.
- Drain any remaining water from the hot tank by dispensing hot water from the machine until the water tank is empty.
- Mix Keurig descaling solution with water according to the instructions provided by the manufacturer.
- Add the descaling solution into the water tank.
- Fill the water tank with fresh water until it reaches the maximum fill line.
- Refill the solution tank with the solution mixture.
- Turn on the machine and place a container under the dispensing nozzle.
- Press the dispense button and allow the solution to empty into the container.
- Repeat the process until the water tank is empty.
- Refill the water tank with fresh water and allow it to run through the machine until the water tank is empty.
- Repeat the process if necessary and remember to clean the nozzle and drip tray after the descaling process.
Upgrades and Accessories
Cup Dispenser
The Keurig K3000Se comes with a standard sized cup dispenser that can hold up to 180 cups. It is easy to refill and provides a convenient and hygienic way to store cups for self-service use or shared office spaces.
Water Filtration Kit
The water filtration kit for Keurig K3000Se is an optional feature that helps to purify and enhance the quality of the water used to brew coffee. It uses a charcoal filter that removes impurities and minerals from the water, resulting in clean and fresh water for better-tasting coffee. The kit typically needs to be changed every three to six months depending on usage.
External Hot Water Dispenser
The Keurig K3000Se is one of their popular models and features an external hot water dispenser. This feature allows for easy access to hot water, perfect for making tea, oatmeal, or any other hot beverage.The external hot water dispenser on the Keurig K3000Se has several parts that make it work seamlessly.
These parts include the water tank, pump, heating element, and faucet. With this setup, you can easily control the temperature of the water and dispense as much or as little as you need.
Troubleshooting Your Keurig K3000SE
- Clean the machine regularly: Over time, your Keurig K3000SE may accumulate mineral deposits or dust, causing it to malfunction. To prevent this, clean your machine regularly by descaling it or wiping it down with a damp cloth.
- Check the power source: If your machine doesn’t turn on, check the power source first. Make sure it’s plugged in and that the outlet is working correctly. If it still doesn’t work, it could be an internal issue.
- Check the water supply: If your machine isn’t brewing coffee, make sure that the water tank is full and that the water supply is secure. If the water is not coming out correctly, it could be due to a clogged water line or an issue with the pump.
- Inspect the filter: If your coffee tastes off or the machine isn’t brewing as fast as it used to, check the filter. Replace the filter if necessary or clean it thoroughly.
- Call Customer Service: If none of the above solutions work, call Keurig customer service for further assistance. They will be able to guide you through any additional troubleshooting steps or send a technician to fix the machine if needed.
The End
In conclusion, the Keurig K3000SE is an excellent choice for a coffee brewing system. It is efficient, easy to use, and provides you with a wide range of beverage options. However, it is essential to take care of it and maintain it regularly to ensure its longevity. By referring to the K3000SE Parts Diagram and troubleshooting tips, you can save time, money, and ensure that your brewing system works like a charm for years to come.