
Are you tired of facing the frustrating ‘prime’ error on your beloved Keurig coffee maker? Well, worry no more! In this blog post, we have gathered six incredibly useful tips about how to prime a Keurig and get it brewing again in no time.
You Need To Know Before You Start Priming
Before starting the priming process, there are a few quick troubleshooting steps you can try to potentially resolve the Keurig prime error without going through the entire process. If you encounter the PRIME message, it’s possible that you may have incorrectly attached the water reservoir or your Keurig simply needs a reset.
- First, attempt to detach and reattach the water reservoir (if it is removable).
- Ensure that everything is properly aligned and appears to be in the correct position.
- If this step does not resolve the issue, proceed to the next troubleshooting step.
- Try unplugging your Keurig machine and allow it to sit for a few minutes. This brief period of disconnection may help reset any minor glitches.
- After a few minutes, plug the machine back in, turn it on, and observe if the prime message has disappeared.
By following these quick tricks, you may be able to rectify the Keurig prime error before proceeding with the full priming process.
Why does your Keurig say prime?
When your Keurig displays the “prime” message, it indicates that there is an issue with water flow within the machine. This could be due to a clog or blockage in the water reservoir, needles, or filter screen. It is essential to address this problem promptly to ensure optimal performance and a delicious cup of coffee every time.
What Does It Mean When it Says Prime On A Keurig?
The “prime” message on your Keurig means that the machine needs assistance in getting water flowing properly. This could be because of air trapped in the system or debris obstructing the water pathway. By following the steps below, you can effectively prime your Keurig coffee maker and resolve this error.
How to Prime a Keurig Coffee Maker: 6 ways
Cleaning the water reservoir
Start by removing the water reservoir from your Keurig machine. Thoroughly clean it with warm water, ensuring to remove any buildup or residue that may be affecting the water flow. Pay close attention to the bottom of the reservoir where the water enters the machine.
Taking out the water reservoir
Once the water reservoir is clean, reattach it securely to your Keurig machine. Ensure that it fits snugly and is properly aligned, allowing for a smooth flow of water.
Cleaning the reservoir
Inspect the inside of the water reservoir for any visible debris or particles. If you notice any, use a soft brush or cloth to gently scrub the interior walls and remove any obstructions that could hinder the water flow.
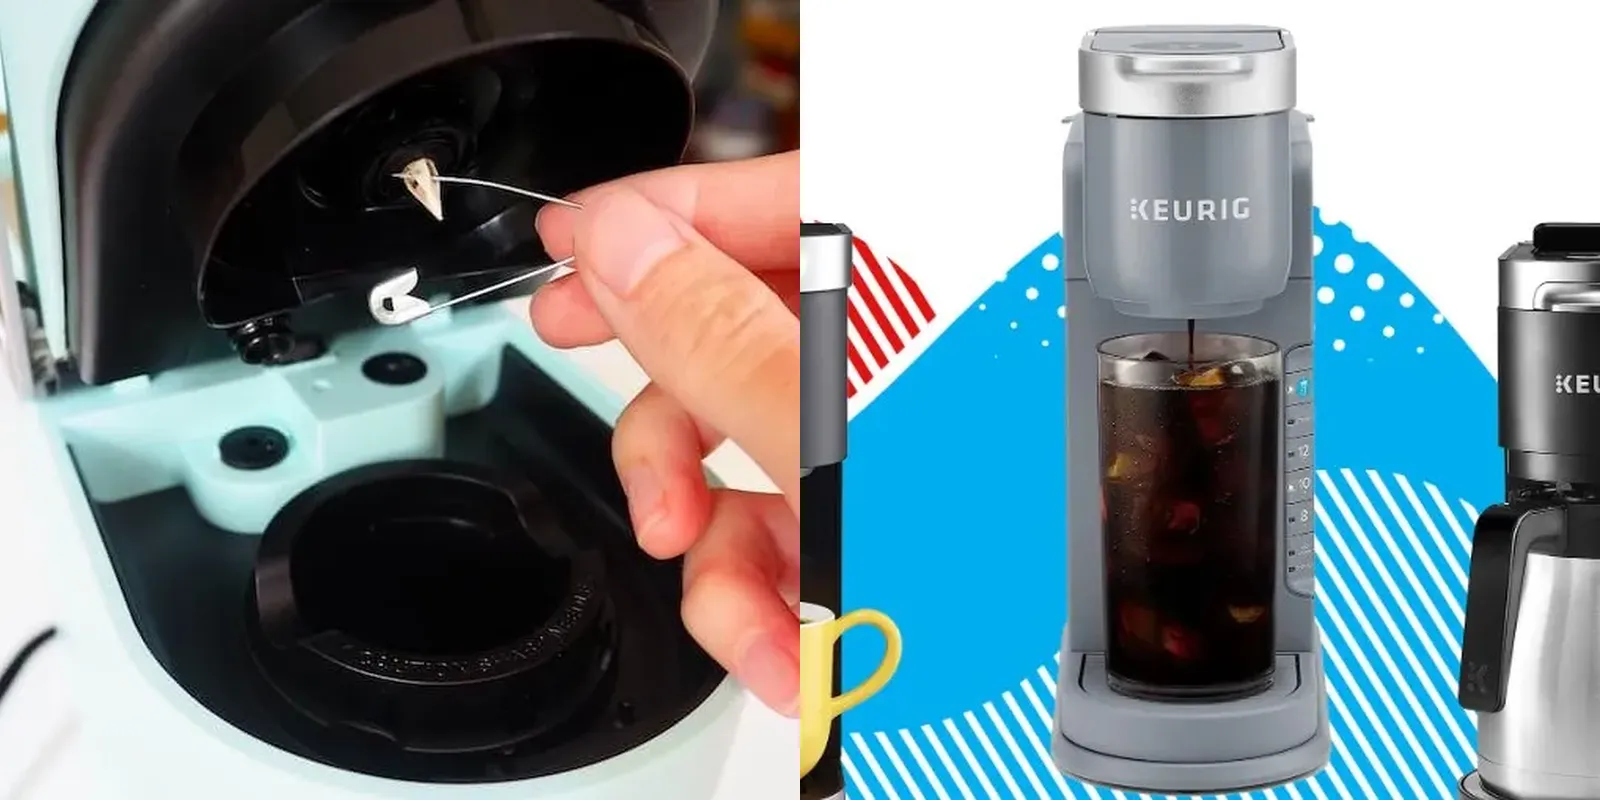
Cleaning the needles
Over time, the needles in your Keurig machine can become clogged with coffee grounds or mineral deposits. To clean them, take a paperclip or needle and carefully unclog the openings. Be gentle during this process to avoid damaging the needles.
Cleaning the filter screen
The filter screen located at the bottom of the water reservoir can accumulate debris over time, hindering the water flow. Remove the filter screen and rinse it under warm water, ensuring that all particles are thoroughly washed away. Once cleaned, reinstall the filter screen securely before proceeding.
Removing Debris from the Needles and Holder
To ensure optimal water flow, inspect the needle holder for any additional debris. If you notice any obstructions, gently remove them using a soft brush or cloth. Clearing away any remaining debris will help restore the proper function of your Keurig coffee maker.
More Need To Know
1. How do I purge the air from my Keurig?
- Fill the Water Reservoir: Start by ensuring that your Keurig’s water reservoir is filled with enough water to brew a cup of coffee.
- Power On and Preheat: Turn on your Keurig and allow it to preheat for a few minutes until the ‘Ready to Brew’ indicator lights up.
- Place a Mug: Place an empty mug or cup on the drip tray to catch any liquid during the priming process.
- Remove and Reinsert the Water Reservoir: Carefully remove the water reservoir from the Keurig and then reinsert it firmly into place. This helps in establishing a proper connection between the reservoir and the machine.
- Run Water Without a K-Cup: Lift the handle on the Keurig and ensure there is no K-Cup inserted. Then, press the brew button without placing a K-Cup in the machine. This will initiate the brewing cycle and help in purging any air trapped in the system.
- Repeat as Necessary: In some cases, a single cycle may not be enough to completely purge the air. If the prime error persists, repeat the process a couple more times until the error message disappears.
2. How do I burp my Keurig?
Burping your Keurig is another method to address the “prime” error and get your machine back to brewing. Here’s how you can do it:
- Step 1: Start by unplugging your Keurig from the power source to ensure safety during the troubleshooting process.
- Step 2: Remove the water reservoir and empty it completely. Also, make sure to remove any remaining water from the drip tray.
- Step 3: Similar to the previous method, carefully remove the water reservoir from the Keurig and then reinsert it firmly into place.
- Step 4: While the Keurig is still unplugged, press and hold the brew button for about ten seconds. This helps in releasing any air trapped in the system.
- Step 5: After releasing the brew button, plug in your Keurig and turn it on. Allow it to go through its normal startup process and preheat.
- Step 6: Lift the handle, ensure there is no K-Cup inserted, and initiate a brew cycle by pressing the brew button. Let the Keurig run a full cycle with just water to further clear out any remaining air.
- Step 7: If the prime error persists, repeat the burping process a few more times until the issue is resolved.
3. How do you get a Keurig to brew?
To get your Keurig to brew properly, follow these steps:
- Step 1: Ensure that the water reservoir is filled with enough water to brew your desired amount of coffee.
- Step 2: Turn on your Keurig and wait for it to complete its preheating process. The ‘Ready to Brew’ indicator light will indicate when the machine is ready.
- Step 3: Lift the handle on the Keurig and insert your preferred K-Cup flavor into the K-Cup holder. Close the handle securely.
- Step 4: Position an empty mug or cup on the drip tray to catch the brewed coffee.
- Step 5: Depending on your Keurig model, choose the desired brew size. The options are usually displayed as buttons on the machine’s control panel.
- Step 6: Once you’ve selected the brew size, press the brew button to start the brewing process. The Keurig will pierce the K-Cup and hot water will be forced through it, extracting the coffee flavor into your mug.
- Step 7: Sit back and wait for your Keurig to complete the brewing cycle. Once done, remove the mug, and enjoy your freshly brewed cup of coffee.
Remember, regular maintenance and cleaning, such as descaling the machine periodically, can help ensure optimal performance and prolong the lifespan of your Keurig coffee maker.
Conclusion
So there you have it – six effective ways to prime your Keurig and say goodbye to that pesky error message. Remember, regular maintenance and cleaning are key to keeping your Keurig in top-notch condition. By following these simple steps and incorporating them into your routine, you can continue to enjoy delicious cups of coffee without any interruption.